> For the complete documentation index, see [llms.txt](https://developer.siteminder.com/llms.txt). Markdown versions of documentation pages are available by appending `.md` to page URLs; this page is available as [Markdown](https://developer.siteminder.com/pmsxchange-api/guides/testing-and-certification.md).
# Testing and Certification
Test your pmsXchange integration and confirm readiness before going live with SiteMinder.
Use this guide to verify that all required integration capabilities are working correctly. Work through the scenarios independently, and when you're confident in your results, notify the Partner Integrations team. We'll review your readiness, prepare your account, and confirm when you can proceed to certification.
## Instructions
This guide provides a series of scenarios to test all required integration capabilities for this API. Some capabilities may be optional — if a scenario does not apply to your integration, skip it and proceed to the next one. Work through each scenario using the resources provided in the Initial Setup section, and use the results to verify your integration is working correctly before requesting certification.
Once all scenarios pass, notify the Partner Integrations team. We will review your results, and if everything looks good, confirm when you can proceed to the formal certification process.
## Initial Setup
Before working through the test scenarios, make sure the following are in place:
1. **Postman collection** — Download and import the [pmsXchange Postman](https://www.postman.com/siteminder-apis/pmsxchange/overview) collection.
2. **Test platform access** — You will need access to our test platform, configured and mapped to your PMS.
3. **Endpoints** — Ensure your endpoint is active and ready to receive requests.
{% hint style="info" %}
SiteMinder will provide credentials for our test endpoints. You will use your own credentials for your endpoint. **Make sure to replace all variables in the Postman collection before running the scenarios.**
{% endhint %}
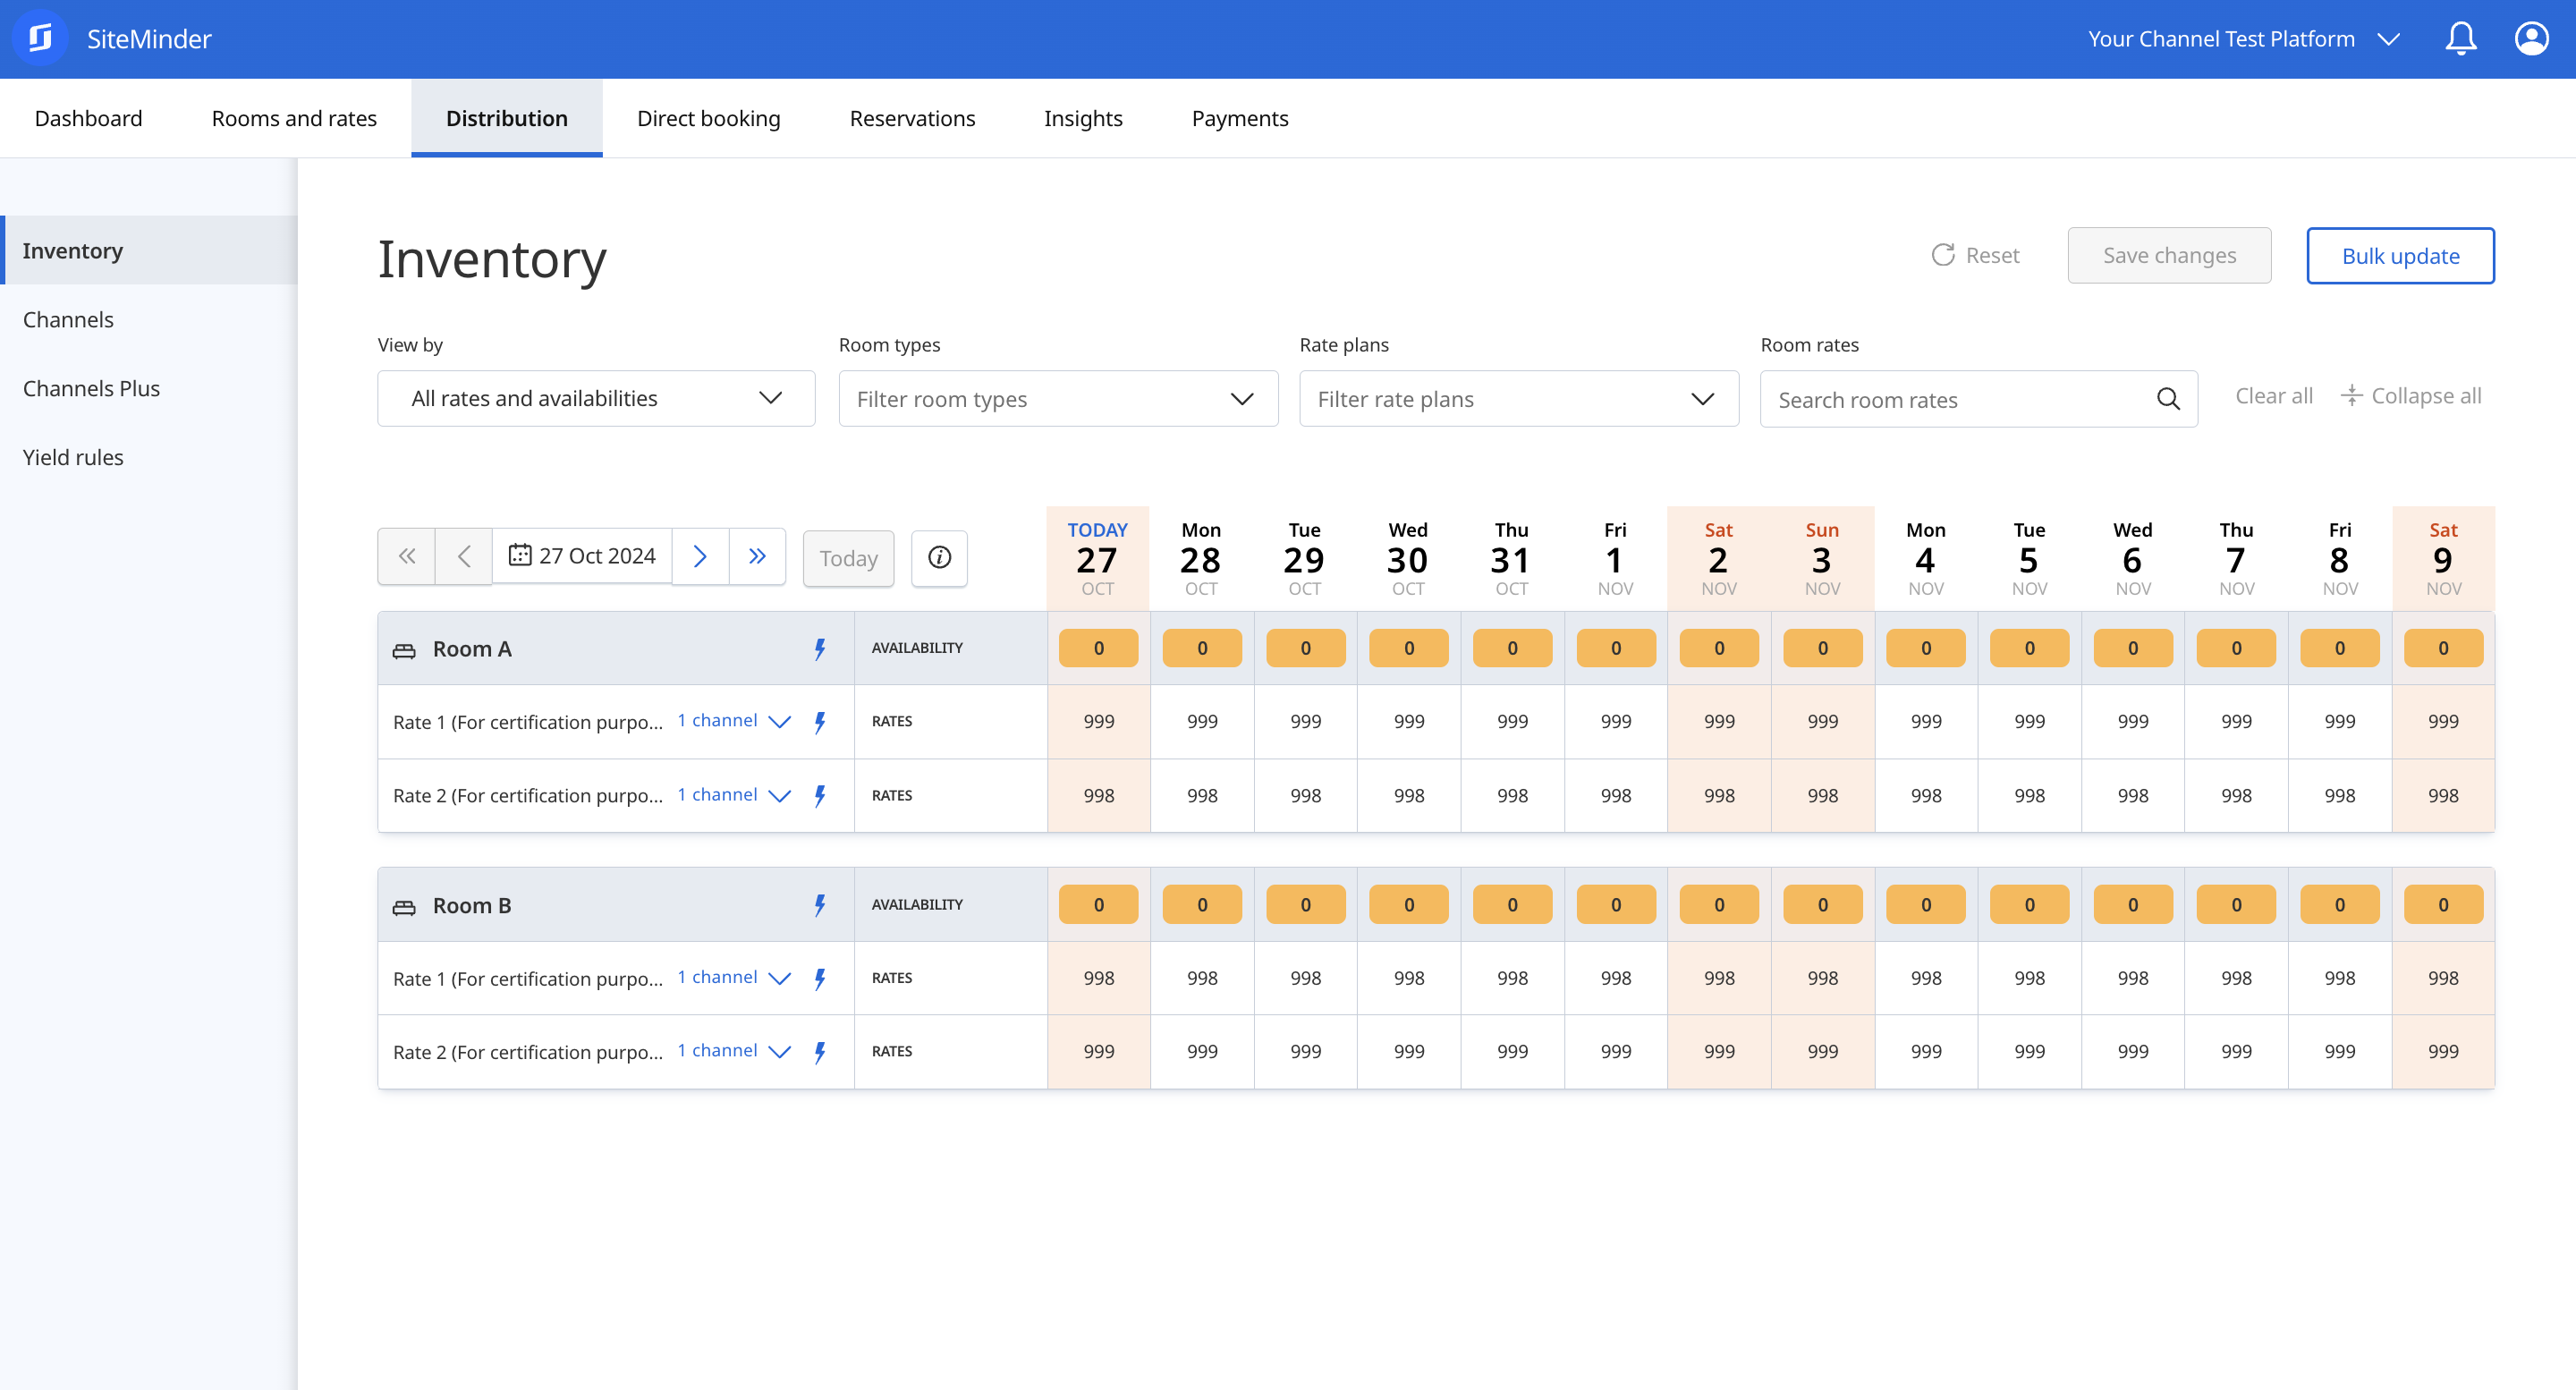
For testing and certification purposes, we have created two basic room types and two basic rate plans that are already mapped to your PMS system. Please create the same room and rate combinations in your system to begin testing and proceed with the self-certification process.
{% hint style="warning" %}
Please do not modify the mapping codes for these room rates, as they will be used for reservation certification scenarios. You may create additional room types and rate plans with your own mapping codes as needed.
{% endhint %}
## Test Scenarios
### 1. Retrieve Rooms and Rates (SM → PMS)
A PMS system sends a request to retrieve the list of configured mapping codes for room types and rate plans from the SiteMinder Platform using the [Rooms and Rates (SM -> PMS)](https://developer.siteminder.com/siteminder-apis/pms-rms/introduction/pmsxchange/api-reference/rooms-and-rates). These returned codes are then stored and used for mapping within the PMS.
{% hint style="info" %}
**Note:** You should have already built and tested this API using the generic test account provided in your welcome pack. In this step, you will call the Rooms and Rates endpoint against your own SiteMinder test platform configuration and validate both the response and the mappings.
{% endhint %}
* Use the **PMS code** and test **hotel code** configured for your integration on the SiteMinder test Platform.
* Call the Rooms and Rates endpoint for your test hotel.
* Replace:
* {pmsCode} with your PMS code.
* {hotelCode} with the SiteMinder test hotel code
* Validate the response
* Map codes in your PMS
{% hint style="success" %}
To successfully complete this scenario, your PMS must have retrieved all room rates mapping codes configured and mapped on SiteMinder Platform.
{% endhint %}
### 2. Small Flush Update
From the PMS, send a small full flush of all mapped room types' availability and restrictions & rates. You can do a flush of 30, 60 or 90 days.
This test ensures your PMS is bundling dates and optimising messages according to our Message Structure requirements: [Availability](/pmsxchange-api/reference/availability.md), [Restrictions (PMS -> SM)](/pmsxchange-api/reference/restrictions/pms-to-sm.md) and [Rates (PMS -> SM)](/pmsxchange-api/reference/rates/pms-to-sm.md).
* Check that you received a **Success** response from SiteMinder
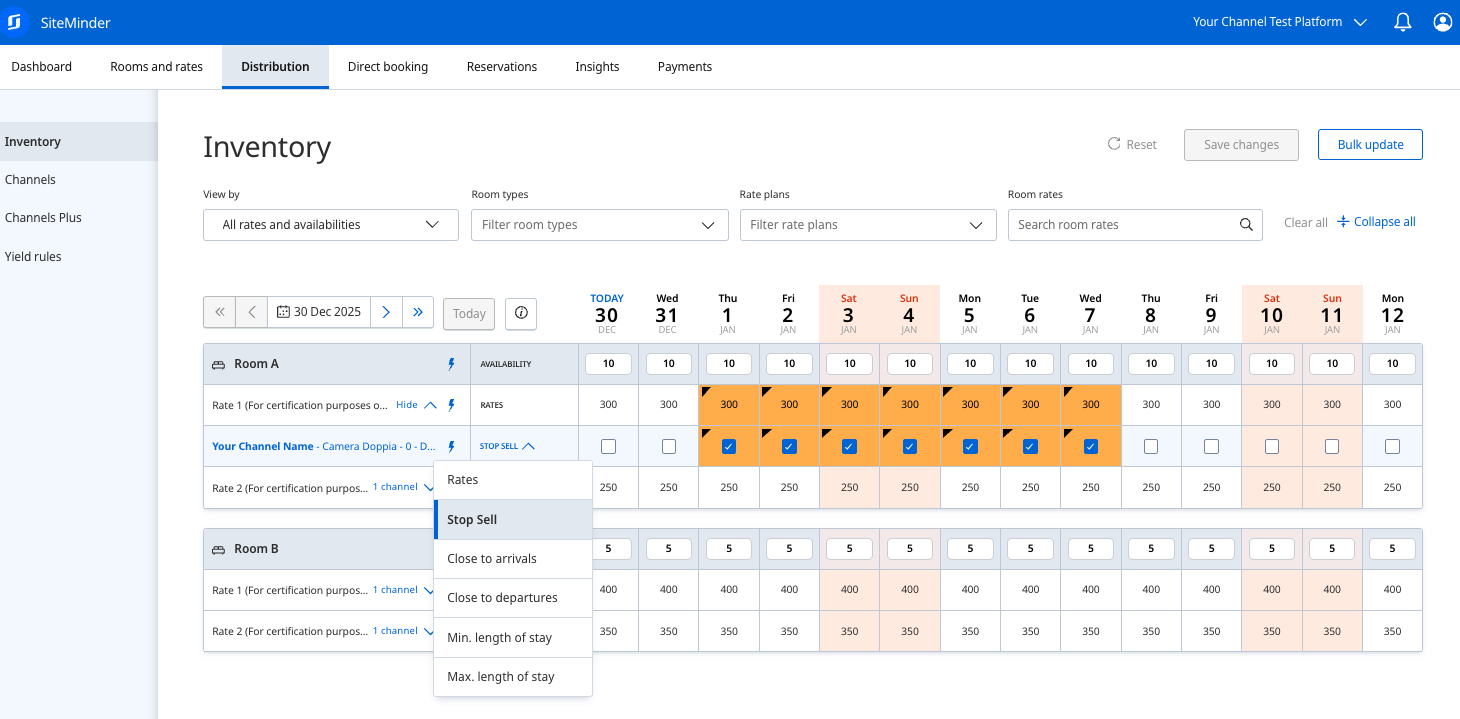
* Check SiteMinder Platform -> Distribution -> Inventory Grid if the updates have been applied.
{% tabs %}
{% tab title="SiteMinder Platform Inventory" %}
{% endtab %}
{% tab title="SiteMinder Platform Restrctions" %}
{% endtab %}
{% endtabs %}
### 3. Targeted Data Update (Delta)
This scenario tests updates where only specific data points, like a single rate change or availability adjustment made in the PMS, are sent for a short period, verifying the PMS ability to push delta data updates efficiently and accurately.
To complete this scenario, first select any future month within the next year. Then, for each specified day in the table (e.g., Day 1, Day 2, Day 5), apply the changes using the corresponding dates within that chosen month. For example, if you select March, use March 1 for Day 1, March 2 for Day 2, and March 5 for Day 5.
### - Availability
Set availability for the following room type and date.
| Room Type | Date | Availability |
| --------- | --------------- | ------------ |
| Room A | Day 1 | 6 |
| Room B | Day 5 to Day 10 | 10 |
### - Restrictions
Set restrictions for the following room rates and dates.
| Room Type | Rate Plan | Date | Restriction |
| --------- | --------- | --------------- | ----------------- |
| Room A | Rate 2 | Day 3 to Day 7 | Enable Stop Sell |
| Room A | Rate 2 | Day 5 | Disable Stop Sell |
| Room A | Rate 2 | Day 4 | Enable CTA |
| Room A | Rate 2 | Day 7 | Enable CTD |
| Room A | Rate 2 | Day 1 to Day 28 | Min. Stay to 2 |
| Room A | Rate 2 | Day 1 to Day 28 | Max. Stay to 7 |
### - Rates
Set rates for the following room rates and dates.
#### PDP
| Room Type | Rate Plan | Date | Value |
| --------- | --------- | ---------------- | ----- |
| Room A | Rate 2 | Day 15 to Day 17 | 200 |
| Room A | Rate 2 | Day 18 | 300 |
| Room A | Rate 2 | Day 20 to Day 21 | 350 |
#### OBP
| Room Type | Rate Plan | Date | Value |
| --------- | --------- | --------------- | ----- |
| Room A | Guest 1 | Day 1 to Day 15 | 150 |
| | Guest 2 | | 200 |
| | Guest 3 | | 250 |
| | Guest 4 | | 300 |
| | Guest 5 | | 350 |
***
### 4. Reservations
You have two options to create test reservations, modifications, and cancellations to validate the **Reservations** API flow:
* **Direct Booking Engine URL** – You can create test bookings through the Direct Booking engine. Refer to the instructions and details provided in your development pack email.
* SiteMinder's **pmsXchange Postman Collection**
This testing and certification guide focuses on reservation creation using the **Postman collection scenarios**, which simulate reservations being sent from a booking channel to SiteMinder and then delivered to your PMS using “*RTC*” as the booking agent code. In the PMSX Postman Collection, we have created six reservation scenarios to help you test how your PMS handles reservations, modifications, and cancellations delivered by SiteMinder.
Refer to the [Reservation Push](/pmsxchange-api/reference/reservations/push.md) or [Reservation Pull](/pmsxchange-api/reference/reservations/pull.md) for further details on the reservation data you will receive.
{% hint style="warning" %}
Before you begin, you must fork SiteMinder's [pmsXchange Postman Collection](https://www.postman.com/siteminder-apis/pmsxchange/overview) and set up the environment with your given test details.
For security reasons, always use test credit card details and never real ones when testing reservations. Refer to [Test Credit Cards](/pmsxchange-api/additional-resources/reference-tables/test-credit-cards.md).
{% endhint %}
**Purpose**
* Verify that your PMS can successfully receive **reservations**, **modifications**, and **cancellations** from SiteMinder via pmsXchange (PUSH or PULL, depending on your configured method).
* Ensure that, for each message, the PMS can either **confirm receipt** or **report processing failure**.
* Ensure that your PMS sends OTA\_HotelAvailNotifRQ updates to SiteMinder with the **correct delta availability** after reservations, modifications, and cancellations are processed
* Only delta updates are acceptable.
* Check-out dates and any non-occupied dates must not be included in the availability update.
### – Create Test Reservations
**Scenario 1 – Reservation 1 (Single Reservation)**\
This scenario creates **Reservation 1** as a simple baseline booking. A single reservation is created for one room type and one rate plan for a 3-night stay.
**Verify that:**
* The reservation is successfully created in the PMS system.
* The PMS confirms the receipt.
* The PMS sends a **delta reduced availability update** (OTA\_HotelAvailNotifRQ) for the room type and dates in the reservation.
***
**Scenario 2 – Reservation 2 (Modify Date and Room Type)**\
Reservation 2 starts as a single reservation for one room type and one rate plan for 3 nights (Day 23, 24, 25), and will then be modified and cancelled in the sub-scenarios.
**Verify that:**
* The initial reservation is successfully created in the PMS system.
* The PMS confirms the receipt.
* The PMS sends a **delta reduced availability update** (OTA\_HotelAvailNotifRQ) for the room type and those dates in the reservation.
**Scenario 2.1 – Modify Dates**\
This step modifies **Reservation 2** by changing only the **stay dates**. The original reservation has a check-in on Day 23 for a 3-night stay. In this scenario, the check-in is moved to Day 24, while the length of stay (3 nights), room type, and rate plan all remain unchanged.
**Verify that:**
* The updated reservation in your PMS reflects the **new check-in date** (Day 24) and the correct 3-night stay.
* The PMS confirms the receipt.
* The PMS sends a **delta update** (OTA\_HotelAvailNotifRQ) that:
* **Releases** availability for the original check-in date (Day 23).
* **Reduces** availability for the newly occupied night (Day 25).
**Scenario 2.2 – Modify Room Type**\
This step modifies **Reservation 2** by changing only the **room type**. Using the reservation after Scenario 2.1 (check-in Day 24, 3-night stay), the booking is updated to a different room type, while the check-in date, length of stay, and rate plan remain unchanged.
**Verify that:**
* The reservation in your PMS now shows the **new room type**, with the same check-in/check-out dates, length of stay, and rate plan.
* The PMS confirms the receipt.
* The PMS sends a **delta update** (OTA\_HotelAvailNotifRQ) that:
* **Increases** availability for the original room type for the occupied dates.
* **Decreases** availability for the new room type for the same dates.
**Scenario 2.3 – Cancel Reservation 2**\
This step **cancels Reservation 2 completely**. The same reservation used in Scenarios 2.1 and 2.2 is now fully cancelled, releasing all previously booked room nights back to availability.
**Verify that:**
* The reservation status in your PMS is **cancelled**.
* The PMS confirms the receipt.
* The PMS sends a **delta update** (OTA\_HotelAvailNotifRQ) that **increases availability** for all cancelled room nights (correct room type and dates).
***
**Scenario 3 – Reservation 3 (Multiple Rooms – Different Room Types)**\
This scenario creates **Reservation 3** with **two different room types** under the same reservation ID. Both rooms share the same stay dates and are part of a single multi-room booking that will then be modified and cancelled in the sub-scenarios.
**Verify that:**
* The initial reservation is successfully created in the PMS system with **two rooms** (**two different room types**).
* The PMS confirms the receipt.
* The PMS sends a **delta reduced availability update** (OTA\_HotelAvailNotifRQ) for **both** room types and their dates in the reservation.
**Scenario 3.1 – Remove 1 Room**\
This step modifies **Reservation 3** by **removing one of the room types**, so that only one room remains active under the same reservation ID.
**Verify that:**
* The updated reservation in your PMS still has the same reservation ID, but now **only one active room** (one room type) remains.
* The PMS confirms the receipt.
* The PMS sends a **delta update** (OTA\_HotelAvailNotifRQ) that:
* **Increases** availability for the removed room type for the affected dates.
**Scenario 3.2 – Add 2 Rooms**\
This step modifies **Reservation 3** from Scenario 3.1 by **adding 2 additional rooms** to the active reservation (for a total of 3 rooms under the same reservation ID).
**Verify that:**
* The updated reservation in your PMS still has the same reservation ID, now with **3 active rooms** (the original remaining room + 2 newly added rooms).
* The PMS confirms the receipt.
* The PMS sends a **delta reduced availability update** (OTA\_HotelAvailNotifRQ) for the additional added rooms and their dates.
**Scenario 3.3 – Cancel Reservation 3**\
This step **cancels Reservation 3 completely**. The multi-room reservation used in Scenarios 3, 3.1, and 3.2 is now fully cancelled, releasing all booked room nights back to availability.
**Verify that:**
* The reservation status in your PMS is **cancelled** for the entire multi-room booking.
* The PMS confirms the receipt.
* The PMS sends a **delta update** (OTA\_HotelAvailNotifRQ) that **increases availability** for all rooms and dates associated with Reservation 3.
***
**Scenario 4 – Reservation 4 (Multi Rooms – Different Rate Plans)**\
This scenario creates **Reservation 4** with **multiple rooms** on **different rate plans** under a single reservation ID.
Verify that:
* The reservation is successfully created in the PMS system, with **each room linked to its own rate plan**.
* The PMS confirms the receipt.
* The PMS sends a **delta reduced availability update** (OTA\_HotelAvailNotifRQ) for the booked dates.
***
**Scenario 5 – Reservation 5 (Multi Rooms – Back-to-back Stays on Different Rate Plans)**\
This scenario creates **Reservation 5** with **two rooms**, where the stays are **back-to-back** and use different rate plans.
**Verify that:**
* The reservation is successfully created in the PMS system.
* The PMS confirms the receipt.
* The PMS sends a **delta reduced availability update** (OTA\_HotelAvailNotifRQ) for the **occupied nights** and room type.
***
**Scenario 6 – Reservation 6 (Multi Rooms – Split Date Range)**\
This scenario creates **Reservation 6** with **two separate stays** under a single reservation ID, where the stays are not consecutive.
**Verify that:**
* The reservation is successfully created in the PMS system.
* The PMS confirms the receipt.
* The PMS sends a **delta reduced availability update** (OTA\_HotelAvailNotifRQ) only for the **occupied nights** of each stay, reflecting the **split date ranges**.
### – Validate Availability Updates (Optional but Recommended)
As a final self-certification step for the Reservations section, you can use the pmsXchange Postman Collections (***Room Level Avail. Res. Certification*** or ***Rate Level Avail. Res. Certification***) to validate that availability updates sent from your PMS back to SiteMinder are correct after each reservation, modification, and cancellation event.
Using the Postman collection to:
* **Get initial availability**
* Call **Get initial availability** for the relevant room type and dates to see the **current availability** stored in SiteMinder’s system received from the PMS.
* **Create the reservation scenario**
* Run the corresponding **reservation scenario** (new booking, modification, or cancellation) from the pmsXchange Postman Collection so the booking is created, modified, or cancelled in SiteMinder and delivered to your PMS.
* **Get updated availability**
* **Call Get updated availability** for the same room type and dates to see the new availability stored in SiteMinder’s system after your PMS update.
* **Compare results**
* Check that availability has **increased** or **decreased** only for the occupied nights.
{% hint style="info" %}
**Note:** For the Reservation Certification scenarios, you can run the collections. The delay between scenarios is controlled by the **delayRun** variable in the *pmsx-api* environment.
{% endhint %}
***
### 5. Reservation Upload
**Purpose:**\
Verify that your PMS can actively and correctly upload reservations to SiteMinder for each supported reservation type (Walk‑in, SiteMinder‑originated, direct booking channel, CRS/GDS/wholesaler), using the correct POS and ID mapping so that SiteMinder can classify and enrich the data.
**Scenario 1 – ResStatus coverage**\
This scenario confirms that your PMS sends the supported `HotelReservation@ResStatus` values correctly for a standard reservation.
**Scenario 1.1 - New reserved reservation (base case)**
* In your PMS, create a new standard reservation. This scenario focuses on **ResStatus** coverage rather than a specific reservation type.
* Send a Reservation Upload to SiteMinder.
**Expected Upload:**
* `HotelReservation@ResStatus="Reserved"`
* `HotelReservation@CreateDateTime` is set to the reservation creation time.
* `HotelReservation@LastModifyDateTime` is equal to `CreateDateTime` for the first creation.
* All usual minimum reservation content is present:
* `RoomStays` (room type, dates, rate plan, totals, etc.).
* `ResGuests` (guest profile and contact details).
* `ResGlobalInfo` (hotel code, reservation IDs, totals, etc.).
**Scenario 1.2 - Cancellation of that reservation**
* In your PMS, cancel the same reservation created in scenario 1.1.
* Send a Reservation Upload to SiteMinder.
**Expected Upload:**
* `HotelReservation@ResStatus="Cancelled"`
* `HotelReservation@LastModifyDateTime` is updated to the cancellation time.
* The primary reservation identifier is the same as in Scenario 1.1 (for example, the PMS confirmation ID carried in `UniqueID` or `HotelReservationIDs`).
* Reservation content remains present as the original reservation.
**Scenario 1.3 - Other ResStatus values**\
If your PMS supports additional status values, repeat the above flow for:
* **In-house** – Check‑in the reservation, then upload the In‑house event.
* **No-show** – Allow the reservation to pass the check‑in deadline (for example, after nightly audit) so the reservation becomes No‑show, then upload that event.
* **Checked-Out** – Check out a reservation and upload the Checked‑Out event.
***
**Scenario 2 – Walk‑in reservations (PMS Reservation)**\
This scenario tests your system’s ability to upload Walk‑in reservations using the **`WalkInIndicator`** attribute.
**Scenario 2.1 - Walk-In, Same-day check-in**
* In your PMS, create a Walk‑in reservation with check‑in date = **today**
* Send a Reservation Upload to SiteMinder.
**Expected Upload:**
* Reservation type: **Walk‑in Reservation** (POS with PMS as source, `WalkInIndicator="true"` and PMS ID only).
* `HotelReservation@ResStatus="Reserved"`
* `HotelReservation@WalkInIndicator="true"`
* The PMS reservation ID is present (for example, `HotelReservationIDs/HotelReservationID ResID_Type="14"` with your PMS reservation ID).
* All minimum reservation content
**Scenario 2.2 - Cancellation of a Walk-in**
* In your PMS, cancel the Walk‑In reservation created in Scenario 2.1.
* Send a Reservation Upload to SiteMinder.
**Expected Upload:**
* Expected reservation type: **Walk‑In Reservation**.
* `HotelReservation@ResStatus="Cancelled"`
* `HotelReservation@WalkInIndicator="true"` is still present (to identify the booking as a Walk‑in).
* The reservation ID used is the same as in Scenario 2.1.
* `LastModifyDateTime` reflects the cancellation time.
***
**Scenario 3 – Modifications / cancellations of reservations originally received from SiteMinder**\
This scenario confirms that your PMS can:
* Receive reservations from SiteMinder (via Reservations PUSH or PULL), and
* Later upload **modifications or cancellations** of those same reservations back to SiteMinder, preserving the SiteMinder reference.
**Scenario 3.1 - SiteMinder reservation → Deliver into PMS → *****Modify***** → Upload**
* Create a test booking in SiteMinder (for example, via Direct Booking or the pmsXchange Postman Collection).
* In your PMS, **modify** that reservation received from SiteMinder (e.g. change stay dates, room type, etc.).
* Send a Reservation Upload back to SiteMinder.
**Expected Upload:**
* Reservation type: **SiteMinder Modification/Cancellation** (PMS ID + SiteMinder ID present)
* The same PMS ID and SiteMinder reservation ID are both present, for example:
* PMS ID as `HotelReservationID ResID_Type="14"`
* SiteMinder ID as `HotelReservationID ResID_Type="25"`
* `HotelReservation@ResStatus="Reserved"` (if still active).
* `LastModifyDateTime` is updated to the modification time.
* The change is reflected correctly in `RoomStays` (dates, occupancy, rate, or room type, depending on the modification).
**Scenario 3.2 - SiteMinder reservation → Deliver into PMS → *****Cancel***** → Upload**
* Repeat the first part of Scenario 3.1 (create in SiteMinder, deliver to PMS, confirm receipt).
* In your PMS, **cancel** the reservation.
* Send a Reservation Upload to SiteMinder.
**Expected Upload:**
* The same reservation ID linkage as in Scenario 3.1 is maintained (PMS ID + SiteMinder ID).
* `HotelReservation@ResStatus="Cancelled"`
* `LastModifyDateTime` is updated to the cancellation time.
***
**Scenario 4 – Reservations from other sources → PMS → Reservation Upload**\
This scenario validates that **non‑SiteMinder** reservation sources supported by your PMS can also be uploaded to SiteMinder with the correct POS and ID mapping.
**Scenario 4.1 - Direct booking channel (non‑SiteMinder) → PMS → Upload**
* Create a reservation in your PMS from a **direct booking channel** that does not go through SiteMinder (PMS own booking engine or other non-SiteMinder direct source)
* Send a Reservation Upload to SiteMinder
**Expected Upload:**
* Reservation type: Direct Booking reservation that does not go through SiteMinder.
* POS / `BookingChannel` identify the direct booking channel:
* `POS/Source/RequestorID Type="10" ID="PMSCODE"`
* `BookingChannel Primary="true" Type="7"` with `CompanyName/@Code` set to your direct channel code.
* `ResGlobalInfo/HotelReservationIDs` includes:
* `HotelReservationID ResID_Type="14"` – PMS reservation ID.
* `HotelReservationID ResID_Type="29"` – direct channel reservation ID (where applicable).
* `HotelReservation@ResStatus="Reserved"` on creation.
Then:
* Cancel the same reservation in your PMS and upload the cancellation.
* `HotelReservation@ResStatus="Cancelled"`
* `LastModifyDateTime` is updated.
* The same PMS and channel IDs are used.
**Scenario 4.2 - CRS / GDS / Wholesaler (non‑SiteMinder) → PMS → Upload**
* Create a reservation in your PMS from a CRS, GDS or wholesaler connection that does **not** go through SiteMinder.
* Send a Reservation Upload to SiteMinder.
**Expected Upload:**
* Reservation type: **CRS / GDS / Wholesaler Reservation.**
* POS reflects the CRS/GDS/wholesaler origin
* Primary CRS / GDS / wholesaler:
* `BookingChannel Primary="true" Type="5"` with `CompanyName/@Code`.
* Secondary booking agent / OTA (if applicable):
* Additional `Source` with `BookingChannel Primary="false" Type="7"` and the agent code.
* `ResGlobalInfo/HotelReservationIDs` includes:
* PMS reservation ID as `ResID_Type="14"`
* CRS / agent reference as `ResID_Type="29"` (where applicable).
* `HotelReservation@ResStatus="Reserved"` on creation.
Then:
* Cancel the same reservation in your PMS and upload the cancellation.
* `HotelReservation@ResStatus="Cancelled"`
* `LastModifyDateTime` is updated.
* The same PMS and CRS/agent IDs are used.
{% hint style="warning" %}
**Important**: If your PMS sends reservations from a booking channel that is not listed in the [Booking Agent Codes](https://developer.siteminder.com/siteminder-apis/additional-resources/reference-tables/booking-agent-codes) table, you must request a new booking agent code before using it in `POS/Source/BookingChannel/CompanyName/@Code`. Contact the SiteMinder Partner Integrations team with the booking agent / channel name to have a code created.
{% endhint %}
***
### 6. Reservation Import
**Purpose:**\
Verify that your PMS can successfully request a bulk import of active reservations from SiteMinder. This request triggers a background job that queues these reservations and delivers them to the PMS via the standard [Reservation PUSH](/pmsxchange-api/reference/reservations/push.md) or [Reservation PULL](/pmsxchange-api/reference/reservations/pull.md) flow.
1. Please reach out to the SiteMinder Partner Integrations team when you are ready to test this API.
2. The Partner Integrations team will trigger several bookings for you, then inform you when they are ready for collection.
3. From your PMS, call the **Reservation Import** endpoint to trigger the bulk import job. After the request is accepted, the reservations will be queued and delivered to your PMS via your standard Reservation PUSH or Reservation PULL flow.
### 7. Payment Transaction Record
**Purpose**:\
Verify that your PMS can retrieve payment transaction data from SiteMinder, correctly link each transaction to the corresponding reservation using the SiteMinder Reservation ID and Payment Context ID, and acknowledge processing success or failure using the Payment Transaction Record SOAP API.
**Scenario 1 – Retrieve and confirm a card payment (charge)**
1. **Create a reservation with SiteMinder Pay enabled**
* Create a reservation for your SiteMinder test hotel using SiteMinder Direct Booking, or pmsXchange Postman Collection.
* Ensure the booking flows through SiteMinder and is delivered to your PMS via your standard Reservations PUSH or PULL flow.
* Confirm your PMS has stored:
* `UniqueID Type="14"` (SiteMinder Reservation ID).
* `HotelReservationID ResID_Type="34"` (Payment Context ID).
2. **Process a charge in SiteMinder**
* In the SiteMinder Platform, find this reservation created in step 1. and process a **charge** using SiteMinder Pay (for example, charge part or all of the reservation amount).
* This creates a **Payment Transaction Record** linked to the same Payment Context ID (ResID\_Type="34").
3. **Pull undelivered payment transactions**
* From your PMS, send `SM_HotelResPaymentReadRQ` on your regular schedule (for example, every 2–5 minutes) with `SelectionType="Undelivered"`.
* Use either:
* PMS‑level (no HotelCode) to retrieve all hotels, or
* Hotel‑level with the specific HotelCode used in your test.
4. **Process SM\_HotelResPaymentReadRS**
* In `SM_HotelResPaymentReadRS`, locate the `HotelResPayment` that matches your test reservation.
* Verify that:
* It includes identifiers:
* `UniqueID Type="14"` – SiteMinder Reservation ID.
* `UniqueID Type="34"` – Payment Context ID.
* `PaymentInfo@PaymentTransactionTypeCode="charge"`.
* `PaymentInfo@PaymentType` indicates a card payment.
* `PaymentAmount` (amount + currency) matches the charge you processed.
* Store this payment transaction in your PMS and link it to the correct reservation using the Type 14 and Type 34 IDs.
5. **Acknowledge successful processing**
* After successfully storing and linking the transaction, send `SM_HotelResPaymentResultRQ` to SiteMinder:
* Include one `HotelResPaymentResult` per processed transaction with:
* `@TransactionID` and `@HotelCode` from the original `HotelResPayment`.
* `UniqueID Type="14"` – SiteMinder Reservation ID.
* `UniqueID Type="34"` – Payment Context ID.
* `UniqueID Type="40"` – your own **Delivery Confirmation ID** (unique per PMS confirmation).
* Include `` (no `` in the same request).
* Verify you receive `SM_HotelResPaymentResultRS` with `` and that the same transaction is **not returned again** in subsequent `SM_HotelResPaymentReadRQ` calls.
***
**Scenario 2 – Retrieve and confirm a refund**
1. **Reuse an existing charged reservation**
* Use the same reservation from Scenario 1 (with a successful charge), or create a new reservation and repeat the charge steps first.
* Confirm that your PMS has already:
* Stored the reservation with `ResID_Type="14"` and `ResID_Type="34"`.
* Stored at least one successful charge linked to that Payment Context ID.
2. **Process a refund in SiteMinder**
* In the SiteMinder Platform, process a **refund** for that reservation using SiteMinder Pay.
* You may perform:
* A **full refund**, or
* A **partial refund** (recommended) to ensure your PMS can handle updates to the running balance.
3. **Pull and process the refund transaction**
* As in Scenario 1, let your scheduled `SM_HotelResPaymentReadRQ` run and receive `SM_HotelResPaymentReadRS`.
* Locate the new `HotelResPayment` entry for this refund and verify that:
* `UniqueID Type="14"` and `Type="34"` match the same reservation and Payment Context as in the original charge.
* `PaymentInfo@PaymentTransactionTypeCode="refund"`
* Update the reservation in your PMS to reflect the refund.
4. **Acknowledge the refund**
* Send `SM_HotelResPaymentResultRQ` with:
* `HotelResPaymentResult` including the refund `TransactionID`, `HotelCode`, and the same UniqueIDs (Type 14, 34, and your Type 40 Delivery Confirmation ID).
* A `` element to confirm processing.
* Verify the refund transaction is not re‑delivered in future `SM_HotelResPaymentReadRQ` calls.
{% hint style="info" %}
For details on how to perform charge and refund in the UI, see: [Video: Process payments and refunds](https://help-platform.siteminder.com/en/articles/9856839-video-process-payments-and-refunds)
{% endhint %}
***
**Error handling (applies to both charge and refund)**
* If your PMS cannot process a specific transaction (charge or refund), send `SM_HotelResPaymentResultRQ` with an `` block instead of ``:
* Include at least one `` with:
* An appropriate error code from the standard error code table.
* Error type and a brief human‑readable description (for example, “Reservation not found in PMS”).
* SiteMinder will treat the transaction as **delivered with error** and will not send it again.
* Send **separate** result messages for successes and errors. Do not mix `` and `` in the same request.
## Final Steps
Once all scenarios have passed, notify the Partner Integrations team. We will review your results and confirm when you can proceed to certification. If any issues are identified during the review, we will reach out to you directly to resolve them before moving forward.
{% hint style="success" icon="sparkles" %}
## Still have questions?
Use the :gitbook-assistant: **Ask** button at the top of the page to chat with our AI assistant — it can help you navigate the guide, understand requirements, and troubleshoot issues.
If you need more support, visit [Integration Support](/integration-support/integration-support.md).
{% endhint %}
---
# Agent Instructions
This documentation is published with GitBook. GitBook is the documentation platform designed so that both humans and AI agents can read, navigate, and reason over technical content effectively. Learn more at gitbook.com.
## Querying This Documentation
If you need additional information that is not directly available in this page, you can query the documentation by asking a question.
Perform an HTTP GET request on the following URL with the `ask` and `goal` query parameters:
```
GET https://developer.siteminder.com/pmsxchange-api/guides/testing-and-certification.md?ask=&goal=
```
`ask` is the immediate question: it should be specific, self-contained, and written in natural language.
`goal` is what the user is ultimately trying to achieve, the reason they need the answer. Sharing it helps GitBook give you a better, more relevant answer. A goal is most helpful when it describes the outcome the user wants rather than restating the question. For example, with `ask=how do I create an API token`, a goal like `automate deployments from our CI pipeline` lets GitBook tailor the answer to that use case.
The response will contain a direct answer to the question and relevant excerpts and sources from the documentation.
Use this mechanism when the answer is not explicitly present in the current page, you need clarification or additional context, or you want to retrieve related documentation sections.